
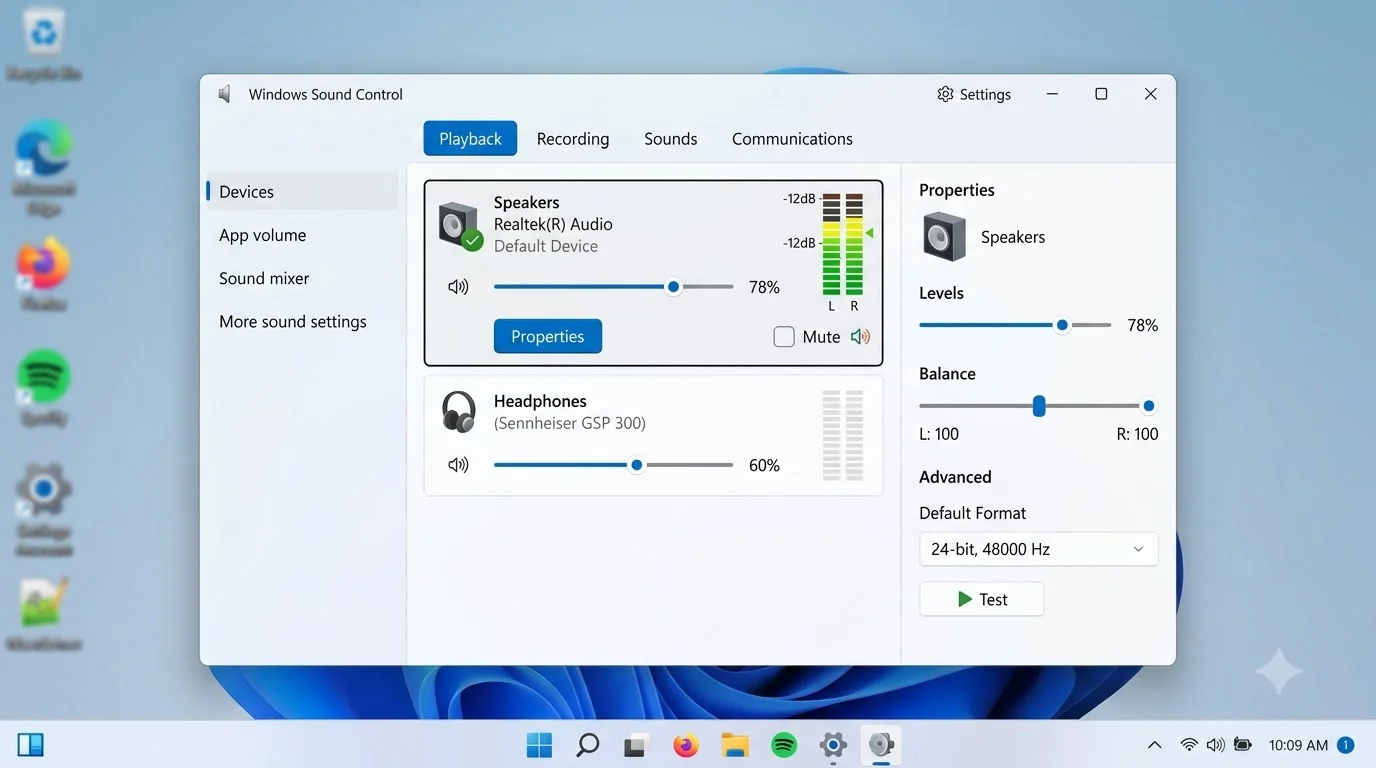
How to open the Sound Control Panel instantly:
- Press Windows + R → type
mmsys.cpl→ hit Enter - Settings route → Settings → System → Sound → More sound settings
- Speaker icon method → Right-click taskbar speaker → Sound settings → More sound settings
- Classic path → Control Panel → Hardware and Sound → Sound
- Search method → Type “Sound Control Panel” in Start menu and click the result
Fastest method: Windows + R + mmsys.cpl takes less than 5 seconds.
Why the Sound Control Panel Remains Critical in 2026
When Windows 11 arrived, many users thought the Sound Control Panel would disappear into history. But here’s the truth: Windows Settings handles everyday audio tasks, while the Sound Control Panel controls everything else.
If you need to:
- Set a default microphone for Zoom calls
- Test whether your headphones are actually connected
- Disable echo and background noise filters
- Configure professional audio equipment
- Fix a missing audio device
- Adjust microphone sensitivity for streaming
…then you need the Sound Control Panel. It’s not outdated—it’s specialized. Think of Settings as the dashboard and Control Panel as the engine room.
Practical example: A podcaster in Mumbai tried adjusting microphone levels in Settings but couldn’t find the feature. The Sound Control Panel had the option in 15 seconds.
Inside the Sound Control Panel: What You’ll Actually Find
Before diving into how to open it, here’s what awaits inside:
Playback Tab
- Shows all speakers, headphones, and audio outputs connected to your PC
- Set default devices for regular playback and video calls separately
- Test audio output with a test sound
- Access advanced device properties for professional settings
Recording Tab
- Lists all microphones, line-in inputs, and virtual audio devices
- Choose which microphone Windows uses by default
- Adjust microphone sensitivity and levels
- Enable/disable voice activation
Sounds Tab
- Assign custom sounds to Windows events (startup, shutdown, errors)
- Test event sounds before applying them
- Create consistent audio branding across your system
Communications Tab
- Control how Windows automatically reduces other sounds when you’re on a call
- Prevents YouTube playing over your Zoom conversation
- Adjustable reduction levels (full mute, 80%, 50%, or none)
Advanced Tab
- Set sample rates and bit depth for professional audio (24-bit, 48 kHz)
- Enable exclusive mode for low-latency gaming or music production
- Configure advanced spatial audio settings
Five Proven Methods to Open the Sound Control Panel
Method 1: The Run Box (Fastest)
This is the speed-run approach—professional technicians use this daily.
Steps:
- Press
Windows Key + Ron your keyboard - Type
mmsys.cpl(exactly as written) - Press Enter
- The Sound Control Panel opens instantly
Why it works: mmsys.cpl is the direct file command that Windows recognizes on any PC, anywhere.
Pros:
- Works on Windows 10 and 11
- Bypasses Settings menu updates
- Takes 3 seconds maximum
- Works in scripts and automation
Cons:
- Requires memorizing a command
- Not graphical/menu-driven
Best for: Power users, IT support staff, anyone troubleshooting audio remotely
Method 2: Windows Settings (The New Way)
If you prefer clicking through menus, this is your route.
For Windows 11:
- Click the Start menu
- Type “Settings” and open it (or press Windows + I)
- Navigate to System → Sound
- Scroll down to the “Advanced” section
- Click “More sound settings”
- The Sound Control Panel opens
For Windows 10:
- Open Settings (Windows + I)
- Go to System → Sound
- Under “Related settings,” click “Sound Control Panel”
- You’re there
Pros:
- Graphical and user-friendly
- Shows context about modern audio options
- Perfect for learning the layout
Cons:
- Takes longer than the Run method
- Menu location changes between Windows versions
- Requires navigating multiple screens
Best for: New users, people who prefer visual navigation, casual audio adjustments
Method 3: Speaker Icon Right-Click (The Quick Grab)
Your taskbar’s speaker icon is a shortcut you probably overlook.
Steps:
- Locate the speaker icon in your taskbar (bottom-right corner)
- Right-click it
- A small menu appears—click “Sound settings” or “Open Sound settings”
- Click “More sound settings” in the new window
- The Sound Control Panel launches
Pros:
- One right-click away when already adjusting volume
- Visible and accessible from anywhere
- Combines two tasks efficiently
Cons:
- Requires two clicks to reach the Control Panel
- Speaker icon location changes if you hide system tray icons
- Doesn’t work if audio drivers are severely corrupted
Best for: Quick access while using your PC normally, adjusting audio while in meetings
Method 4: Control Panel Navigation (The Classic Path)
Long-time Windows users recognize this route.
Steps:
- Open the Start menu
- Type “Control Panel” and press Enter
- Once inside, click “Hardware and Sound”
- Click “Sound”
- The Sound Control Panel opens
Pros:
- Familiar to anyone who’s used Windows for years
- Logical structure if you need other hardware settings
- Reliable on both Windows 10 and 11
Cons:
- Slower than direct methods
- Control Panel interface looks dated
- Multiple clicks required
Best for: Users comfortable with traditional Windows interfaces, IT professionals managing multiple settings
Method 5: Command Line & Search (The Developer Approach)
For those who work in terminals or prefer automation.
Start Menu Search:
- Press the Windows key
- Type “Sound Control Panel” or “mmsys.cpl”
- Press Enter when you see the result
Command Prompt:
- Press Windows + R
- Type
cmdand press Enter - In the command prompt, type
mmsys.cpland press Enter
PowerShell:
- Right-click the Start menu and select Windows PowerShell (Admin)
- Type:
Start-Process mmsys.cpl - Press Enter
Pros:
- Scriptable for automation
- Perfect for IT deployment
- Works in remote troubleshooting scenarios
- No GUI needed
Cons:
- Requires command line knowledge
- Less user-friendly for beginners
- Terminal window remains open
Best for: System administrators, automation specialists, remote support teams
Comparison Table: All Five Methods Side-by-Side
| Method | Speed | Windows 10 | Windows 11 | Best For | Steps Required |
|---|---|---|---|---|---|
| Run Box (mmsys.cpl) | ⚡ 3 seconds | ✅ Yes | ✅ Yes | Power users, scripting | 3 |
| Settings → Sound → More | ⚡ 8-10 seconds | ✅ Yes | ✅ Yes | GUI-preferring users | 5 |
| Speaker Icon Right-Click | ⚡ 5 seconds | ✅ Yes | ✅ Yes | Quick access during use | 2-3 |
| Control Panel → Hardware | ⏱️ 12-15 seconds | ✅ Yes | ✅ Yes | Classic interface users | 4 |
| Start Search or Command | ⏱️ 8 seconds | ✅ Yes | ✅ Yes | Terminal users | 2-3 |
Winner for Speed: Run Box (mmsys.cpl) — consistently fastest
Winner for Ease: Speaker Icon Right-Click — simplest for casual users
Winner for Automation: Command Line methods — only option for scripts
Essential Tasks Inside the Sound Control Panel
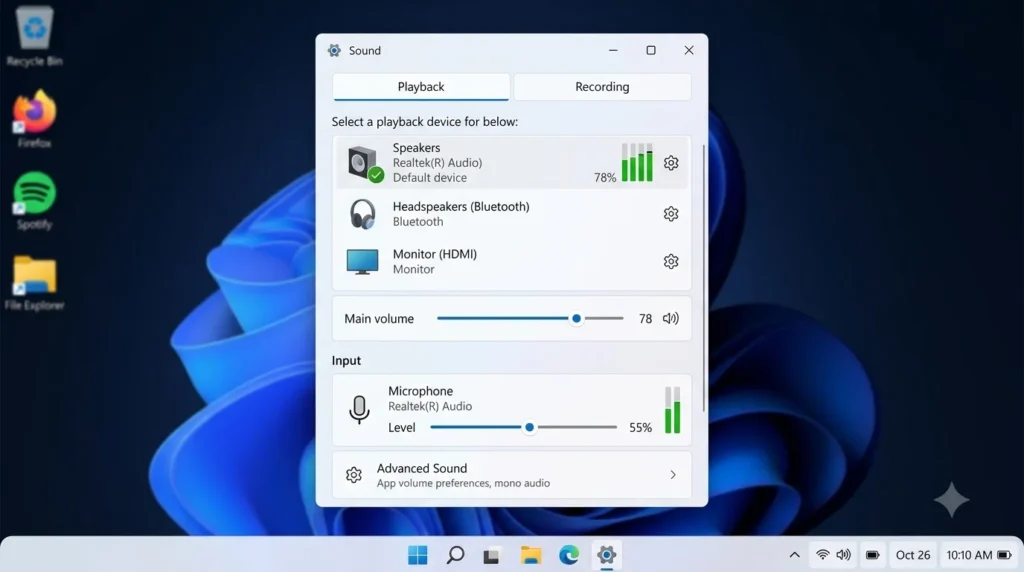
Now that you know how to open it, here’s what to do once you’re inside:
Setting Your Default Microphone
Why you need this: Windows might default to your built-in laptop mic when you want to use a USB headset instead.
Steps:
- Open Sound Control Panel (use any method above)
- Click the Recording tab
- Right-click your preferred microphone
- Select “Set as Default Device”
- For video calls specifically, select “Set as Default Communication Device”
- Click Apply → OK
Pro tip: You can have different defaults for regular audio and communication (calls). This prevents Zoom from using your laptop mic when you want a USB headset.
Testing Your Speakers
Why you need this: Verify audio output before a presentation or important call.
Steps:
- Go to the Playback tab
- Select your speaker or headphones
- Click “Configure” button
- Click “Test”
- You’ll hear a test tone in each channel
- Close the test and click Next → Finish
Adjusting Microphone Input Levels
Why you need this: People can’t hear you, or you’re too loud in calls.
Steps:
- Click the Recording tab
- Right-click your microphone → Properties
- Click the Levels tab
- Adjust the slider:
- Drag left to reduce volume (quieter input)
- Drag right to increase volume (louder input)
- Click Apply → OK
Real example: A streamer in Bangalore had low microphone volume. Instead of buying a new mic, she adjusted this setting and doubled her input level.
Disabling Problematic Audio Enhancements
Why you need this: Echo cancellation, noise suppression, or bass boost might be ruining your audio quality.
Steps:
- Right-click your playback device → Properties
- Click the Enhancements tab
- Check “Disable all enhancements” OR uncheck individual effects
- Click Apply → OK
Common culprits causing poor audio:
- Spatial Sound (can cause hollowness)
- Bass Boost (can overwhelm small speakers)
- Loud Noise (might cut out quiet passages)
- Echo Cancellation (can make speech sound robotic)
Changing Sample Rate for Professional Audio
Why you need this: Musicians and podcasters need 24-bit/48kHz, while gaming might use 16-bit/44.1kHz.
Steps:
- Right-click your audio device → Properties
- Click the Advanced tab
- Under “Default Format,” click the dropdown
- Select your desired quality:
- 16 bit, 44100 Hz (standard CD quality)
- 24 bit, 48000 Hz (professional/streaming)
- 24 bit, 192000 Hz (studio mastering)
- Click Apply → OK
Troubleshooting: When Things Go Wrong
Problem 1: The Sound Control Panel Won’t Open
Symptom: You type mmsys.cpl and nothing happens.
Solution A – Repair Windows Files:
- Right-click PowerShell (search Start for PowerShell)
- Select “Run as Administrator”
- Copy and paste:
sfc /scannow - Press Enter and wait (this takes 10-15 minutes)
- Restart your PC
- Try opening the Sound Control Panel again
Solution B – Restart Audio Services:
- Press Windows + R
- Type
services.mscand press Enter - Scroll to “Windows Audio”
- Right-click → Restart
- Also restart “Windows Audio Endpoint Builder”
- Try opening mmsys.cpl again
Solution C – Update Audio Drivers:
- Right-click Start → Device Manager
- Expand “Sound, video and game controllers”
- Right-click your audio device → Update driver
- Select “Search automatically for updated driver software”
- Restart when complete
- Try the Sound Control Panel again
Problem 2: Your Microphone/Headphones Don’t Appear
Symptom: You plugged in your USB headset but it’s not showing in the Recording or Playback tabs.
Quick Fix:
- Open Sound Control Panel
- Right-click inside the Playback (or Recording) tab
- Check both:
- ☐ Show Disabled Devices
- ☐ Show Disconnected Devices
- Your device might suddenly appear
If still missing:
- Check the physical connection (try different USB ports)
- Unplug and reconnect the device
- Update drivers (see Solution C above)
- Restart Windows
- Try a different computer to verify the device works
Problem 3: Crackling or Distorted Audio
Symptom: Your audio cuts out, crackles, or sounds distorted.
Try these in order:
- Disable all audio enhancements (as described above)
- Lower your sample rate from 24-bit to 16-bit if using high-quality
- Update audio drivers
- Disable exclusive mode in device Advanced settings
- Check Windows Volume Mixer (search “Volume mixer” in Start) for apps set too loud
Problem 4: Audio Plays from Wrong Speaker
Symptom: Sound comes from your laptop speakers when you want it from headphones.
Solution:
- Open Sound Control Panel → Playback tab
- Right-click your headphones
- Click “Set as Default Device”
- Close and restart audio apps (like Spotify, YouTube)
Sound Control Panel vs. Modern Settings: The Real Difference
Windows Settings added many audio controls, so why use the older Control Panel?
| Feature | Sound Control Panel | Windows 11 Settings | Winner |
|---|---|---|---|
| Default Device Selection | Quick, multi-tab | Simple, in one place | Settings |
| Sample Rate/Bit Depth | Full control (16/24/32-bit) | No option | Control Panel |
| Audio Enhancements (Disable) | Yes, full list | Not available | Control Panel |
| Microphone Input Levels | Detailed slider | Generic | Control Panel |
| Spatial Audio Toggle | Limited | Better options | Settings |
| Device Properties | Deep access | Limited | Control Panel |
| App Volume Control | Not available | Yes, per-app | Settings |
| User Interface | Dated/minimal | Modern/clean | Settings |
Bottom line: Use Settings for everyday tasks. Use Control Panel for advanced troubleshooting, professional audio, or legacy device management.
Pro Tips from Technicians
Create a Desktop Shortcut
Stop typing mmsys.cpl every time. Pin it to your desktop.
Steps:
- Right-click your desktop
- Select New → Shortcut
- Paste this:
mmsys.cpl - Click Next
- Name it “Sound Control Panel”
- Click Finish
- Double-click to open anytime
Bonus: Right-click the shortcut → Pin to Start or Pin to Taskbar for even faster access.
Pin to Your Taskbar
- Create the shortcut above (or use the Run box: Windows + R, type mmsys.cpl)
- Right-click the Sound Control Panel window’s taskbar button
- Click “Pin this program to taskbar”
- Now you have one-click access forever
Use It for Audio Troubleshooting Calls
If you’re helping someone remotely:
- Ask them to press Windows + R
- Type mmsys.cpl
- Press Enter
- You can now see their audio devices and settings through screen share
- Fix the issue from their Recording/Playback tabs
Geo-Targeted Audio Hardware Notes
For users in India:
- Popular affordable USB mics (₹500-2,000 range): Check Playback device properties to ensure 16-bit detection
- Gaming headsets (₹1,500-5,000): Often need enhancements disabled for best sound
- Professional audio equipment (₹10,000+): Requires sample rate adjustment to 24-bit/48kHz
For users in the US:
- Similar USB microphone models available at $8-25
- Gaming peripherals at $20-60
- Professional equipment at $150+
The Sound Control Panel settings remain identical regardless of region—only hardware prices vary.
Frequently Asked Questions
Q1: Is the Sound Control Panel necessary in Windows 11?
Yes, absolutely. While Windows Settings handles basic audio tasks, the Sound Control Panel provides:
- Advanced sample rate control
- Microphone level adjustment
- Audio enhancements management
- Professional audio device configuration
You’ll need it if you have external audio gear, troubleshoot driver issues, or use professional microphones.
Q2: Will the Sound Control Panel disappear in future Windows versions?
Microsoft has kept this tool through Windows 10 and 11. Since many IT professionals and audio specialists rely on it, the company is unlikely to remove it. However, it may eventually move into Settings more completely.
Q3: Can I open the Sound Control Panel on Windows 8 or older?
The mmsys.cpl command works on Windows 7, 8, and newer. However, this guide focuses on Windows 10 and 11, as they’re currently mainstream. Older versions have different Settings layouts.
Q4: My laptop has no sound. Will the Control Panel fix it?
Maybe. The Sound Control Panel can:
- ✅ Help you find disabled devices
- ✅ Let you select a different output device
- ✅ Show if drivers are missing
But it can’t fix physical damage. If your speaker is physically broken, hardware replacement is needed.
Q5: What’s the difference between “Set as Default” and “Set as Default Communication Device”?
- Default Device: Used for music, videos, games, YouTube
- Default Communication Device: Used for Zoom, Teams, Discord, Skype
Setting them separately prevents your gaming audio from playing through your video call microphone.
Connection to Battery Life & PC Performance
While this article focuses on sound settings, your audio configuration affects overall PC performance. A related concern many Windows 10/11 users have is system optimization. If you’re troubleshooting audio AND want to extend battery life, check out our comprehensive guide: How to Extend Your Battery Life Effectively on Windows
Disabling unnecessary audio enhancements and background processes—both configured in the Sound Control Panel and Settings—can reduce CPU usage and improve battery longevity on laptops.
Authoritative External Resources
For additional information and official guidance, consult these trusted sources:
- Microsoft Support – Sound and Audio Devices – Official documentation on Windows audio settings and troubleshooting
- Windows Dev Center – Audio APIs – Technical specifications for audio drivers and device configuration
- PCWorld – Windows Audio Guides – Practical, user-friendly walkthroughs for audio issues
Key Takeaways: Your Sound Control Panel Checklist
- ✅ Bookmark the Windows + R → mmsys.cpl method for instant access
- ✅ Know that Playback tab = speakers/headphones; Recording tab = microphones
- ✅ Use “Set as Default Communication Device” for your preferred call microphone
- ✅ Disable enhancements if audio sounds strange
- ✅ Remember: Settings handles everyday tasks, Control Panel handles professional/advanced needs
- ✅ Create a desktop shortcut so you never forget how to access it
Related Gloobia Articles You’ll Find Helpful
- How to Extend Your Battery Life Effectively on Windows – Optimize your system including audio settings for better battery performance
- Windows Driver Updates & Troubleshooting (see our related guides)
- Device Manager Mastery: Finding and Fixing Hardware Issues